Golang快速入门笔记

一、安装Golang
1、打开官网
*********** 注意go版本包与当前OS的匹配 ***********
2、Linxu中的安装命令
(1)解压源码包
// 将go版本包解压到/usr/local路径中 sudo tar -C /usr/local -xvf go1.20.10.linux-arm64.tar
(2)配置环境变量
// 添加配置变量 vim ~/.bashrc // 添加下列内容到bashrc文件的最后一行 export GOROOT=/usr/local/go export GOPATH=$HOME/go export PATH=$PATH:$GOROOT/bin:$GOPATH/bin // GOROOT 源码包所在路径 // GOPATH 开发者Go的项目默认路径 // 保存后重新引入文件 source ~/.bashrc
(3)检测开发环境
go version // 或者 go --help // 没有任何错误表示环境搭建成功
(4)Code测试
package main // 程序的包名 import "fmt" func main() { fmt.Println("Hello World!"); // golang中的表达式带‘;’和不带';'无区别 }
********** 【注意】函数的 ‘{’ 绝对要和函数名同行,否则编译错误。 **********
1)直接运行
>go run test.go // 输出 Hello World!
2)或者生成二进制文件再运行
>go build test.go >./test // 输出 Hello World!
3、文件构成
(1)/usr/local/go/bin/go 目录中存放的go的编译环境
二、了解Go
1、优势
(1)简单的部署
1)可直接编译成机器码
2)不依赖其他库
3)直接运行即可部署
(2)静态类型语言
1)编译的时候检查出来隐藏的大多数问题
(3)语言层面的并发
1)天生的基因支持
2)充分的利用多核
(4)强大的标准库
1)runtime系统调度机制
2)高效的GC垃圾回收
3)丰富的标准库
(5)易学
1)25个关键字
2)C语言简洁基因,内嵌C语法支持
3)面向对象特征(封装、继承、多态)
4)跨平台
(6)“大厂“领军
(7)运行效率
2、适用领域
(1)云计算基础设施领域
docker、kubernetes、etcd、consul、cloudflare CDN、七牛云存储
(2)基础后端软件
tidb、influxdb、cockroachdb
(3)微服务
go-kit、micro、monzo bank的typhon、bilibili等、
(4)互联网基础设施
以太坊、hyperledger等
3、缺点
(1)包管理 ,大部分包都在GitHub上。
(2)无泛化类型,GO2.0计划有加上(传言)。
(3)所有Excepition都用Error来处理(比较有争议)。
(4)对C的降级处理,并非无缝,没有C降级到asm那么完美(序列化问题)。
三、语法
1、初见main函数
package main // import "fmt" // import "time" import ( "fmt" "time" ) func main() { fmt.Println("Hello World!") time.Sleep(1 * time.Second) // 延迟1秒 }
// 执行 方法一: go run xxx.go 方法二: go build xxx.go
2、变量的声明
(1)变量声明
1、四种变量声明方式
1)Golang中声明的变量,若未赋值,默认为0
package main /* 四种变量的声明方式 */ import ( "fmt" ) func main() { // 方法一:声明一个变量,默认的值是0 var a int fmt.Println("a=", a) fmt.Printf("type of a=%T\n", a) // 方法二:声明一个变量。初始化一个值 var b int = 100 fmt.Println("b=", b) fmt.Printf("type of b=%T\n", b) var str1 string = "abcd" fmt.Printf("str1=%s, Type of str1=%T\n", str1, str1) // 方法三:在初始化的时候,可以省去数据类型,通过自动匹配当前变量的数据类型 var c = 100 fmt.Println("c=", c) fmt.Printf("type of c=%T\n", c) var str2 = "abcd" fmt.Printf("str2=%s, Type of str2=%T\n", str2, str2) // 方法四:(常用方法)省去var关键字,直接自动匹配 d := 100 fmt.Println("d=", d) fmt.Printf("Type of d=%T\n",d) str3 := "abcd" fmt.Printf("str3=%s, Type of str3=%T\n", str3, str3) e := 3.14 fmt.Println("e=", e) fmt.Printf("Type of e=%T\n",e) }
// 输出结果如下 a= 0 type of a=int b= 100 type of b=int str1=abcd, Type of str1=string c= 100 type of c=int str2=abcd, Type of str2=string d= 100 Type of d=int str3=abcd, Type of str3=string e= 3.14 Type of e=float64
声明全局变量,方法一、二、三是可以的,但方法四无法声明全局变量
方法一、二、三、四都可以声明局部变量
方法四只能声明局部变量
package main import ( "fmt" ) // 用方法一、二、三声明全局变量 var gA int = 100 var gB = 200 // 用方法四声明全局变量,报错 var gC := 300 func main() { fmt.Println("gA=", gA, ", gB=", gB) fmt.Println("gC=", gC) }
// 输出结果如下 syntax error: unexpected :=, expected =
(2)多变量声明
package main import ( "fmt" ) func main() { // 声明多个变量 var x, y int = 100, 200 fmt.Println("x=", x, ", y=", y) var z, w = 100, "abcd" fmt.Println("z=", z, ", w=", w) // 多行的多变量声明 var ( m int = 100 n bool = true ) fmt.Println("m=", m, ", n=", n) }
// 输出结果如下 x= 100 , y= 200 z= 100 , w= abcd m= 100 , n= true
3、常量
(1)优雅的常量iota
1)使用iota 时不能离开const
package main import ( "fmt" ) // const 来定义枚举类型 const ( // 可以在const() 添加一个关键字 iota,每行的iota都会累加1,第一行的iota 的默认值是0 BEIJING = 10 * iota // iota = 0 SHANGHAI // iota = 1 SHENZHEN // iota = 2 ) func main() { // 常量[只读属性] const length int = 10 fmt.Println("length=", length) // length = 100 常量是不允许修改的 fmt.Println("BEIJING=", BEIJING) fmt.Println("SHANGHAI=", SHANGHAI) fmt.Println("SHENZHEN=", SHENZHEN) }
// 输出结果如下 length= 10 BEIJING= 0 SHANGHAI= 10 SHENZHEN= 20
(2)自增长
1)iota只能配合const() 一起使用,iota只有在const下进行累加效果。
package main import ( "fmt" ) const ( a, b = iota+1, iota+2 // iota=0, a=iota+1, b=iota+2, a=1, b=2 c, d // iota=1, a=iota+1, b=iota+2, a=2, b=3 e, f // iota=2, a=iota+1, b=iota+2, a=3, b=4 g, h = iota*2, iota*3 // iota=3, g=iota*2, h=iota*3, g=6, h=9 i, k // iota=4, g=iota*2, h=iota*3, g=8, h=12 ) func main() { fmt.Println("a=", a, ", b=", b) fmt.Println("c=", c, ", d=", d) fmt.Println("e=", e, ", f=", f) fmt.Println("g=", g, ", h=", h) fmt.Println("i=", i, ", k=", k) }
// 输出结果如下 a= 1 , b= 2 c= 2 , d= 3 e= 3 , f= 4 g= 6 , h= 9 i= 8 , k= 12
(3)iota和表达式
package main import ( "fmt" ) const ( // 可以在const() 添加一个关键字 iota,第一行的iota 的默认值是0 x = iota // iota = 0 y // iota = 1 z // iota = 2 ) func main() { fmt.Println("x=", x) fmt.Println("y=", y) fmt.Println("z=", z) }
4、函数
(1)多返回值
1)一个返回值
package main import ( "fmt" ) // 返回一个值 func foo1(a string, b int) int { fmt.Println("a=", a) fmt.Println("b=", b) c := 100 return c } func main() { c := foo1("abc", 111) fmt.Println("c=", c) }
// 输出结果如下 a= abc b= 111 c= 100
2)两个返回值
package main import ( "fmt" ) // 返回两个值,匿名的 func foo2(a string, b int) (int, int) { fmt.Println("a=", a) fmt.Println("b=", b) return 666, 777 // 不赋值,直接返回值 } func main() { ret1, ret2 := foo2("abc", 222) fmt.Println("ret1=", ret1, ", ret2=", ret2) }
// 输出结果如下 a= abc b= 222 ret1= 666 , ret2= 777
3)多个返回值
:= 用于声明+赋值,而 = 仅用于赋值
package main import ( "fmt" ) // 返回多个值,有形参名称的 func foo3(a string, b int) (r1 int, r2 int) { fmt.Println("----- foo3 -----") fmt.Println("a=", a) fmt.Println("b=", b) // r1 r2属于foo3的形参,初始化默认的值是0 // r1 r2作用域空间是foo3整个函数体的{}空间 // 给有名称的返回值变量赋值 r1 = 1000 r2 = 2000 return // 上面已赋值,此处直接返回 } func foo4(a string, b int) (r1, r2 int) { fmt.Println("----- foo4 -----") fmt.Println("a=", a) fmt.Println("b=", b) // 给有名称的返回值变量赋值 r1 = 1000 r2 = 2000 return } func main() { // 注意此处用 := ,声明并赋值 ret1, ret2 := foo3("foo3", 333) fmt.Println("ret1=", ret1, ", ret2=", ret2) // 注意此处用 = ,赋值 ret1, ret2 = foo4("foo4", 666) fmt.Println("ret1=", ret1, ", ret2=", ret2) }
// 输出结果如下 ----- foo3 ----- a= foo3 b= 333 ret1= 1000 , ret2= 2000 ----- foo4 ----- a= foo4 b= 666 ret1= 1000 , ret2= 2000
(2)函数参数
1)值传递
2)引用传递
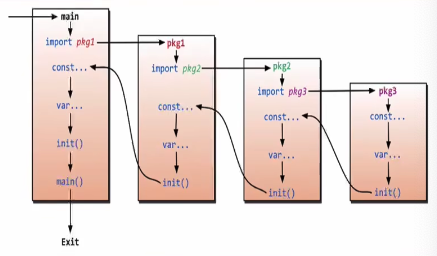
5、import导包路径问题与init方法调用流程
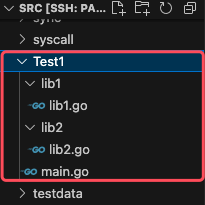
(1)文件需在 /usr/local/go/src 路径下
// 文件路径 Test1 |__ lib1 |__ lib1.go |__ lib2 |__ lib2.go
(2)代码内容
1)/Test1/main.go
package main import ( "Test1/lib1" "Test1/lib2" ) func main() { lib1.Lib1Test() lib2.Lib2Test() }
2)/Test1/lib1/lib1.go
package lib1 import "fmt" func Lib1Test() { fmt.Println("Lib1Test()...") } func init() { fmt.Println("lib1.init()...") }
3)/Test1/lib2/lib2.go
package lib2 import "fmt" func Lib2Test() { fmt.Println("Lib2Test()...") } func init() { fmt.Println("lib2.init()...") }
4)使用 go run main.go 运行程序
// 输出结果如下 lib1.init()... lib2.init()... Lib1Test()... Lib2Test()...
6、import匿名及别名导包方式
(1)匿名导包
1)不使用lib1的接口,但想导入lib1的包,需要在包前面加上“_”。【import _ "fmt"】
给fmt包起一个别名,匿名,无法使用当前包的方法,但是互殴执行当前的包内部的init()方法
// 导入包,但不使用其接口,会报错 package main import ( _"Test1/lib1" "Test1/lib2" ) func main() { // lib1.Lib1Test() lib2.Lib2Test() }
// 输出结果如下 lib1.init()... lib2.init()... Lib2Test()...
********** 【错误示例】 **********
package main import ( "Test1/lib1" "Test1/lib2" ) func main() { // lib1.Lib1Test() lib2.Lib2Test() }
// 错误结果如下 # command-line-arguments ./main.go:4:2: "Test1/lib1" imported and not used
(2)取别名
1)在包前另起名称【import aa "fmt"】
给fmt包起一个别名,aa,aa.Println()来直接调用
package main import ( _"Test1/lib1" mylib2 "Test1/lib2" ) func main() { // lib1.Lib1Test() // lib2.Lib2Test() mylib2.Lib2Test() }
// 输出结果如下 lib1.init()... lib2.init()... Lib2Test()...
2)在包前加“.”,表示lib2包里的方法名都使用当前main包里的方法【import . "fmt"】
将当前fmt包中的全部方法,导入到当前本包的作用中,fmt包中的全部方法可以直接使用API来调用,不需要fmt.API来调用
package main import ( _"Test1/lib1" . "Test1/lib2" ) func main() { // lib1.Lib1Test() // lib2.Lib2Test() Lib2Test() }
// 输出结果如下 lib1.init()... lib2.init()... Lib2Test()...
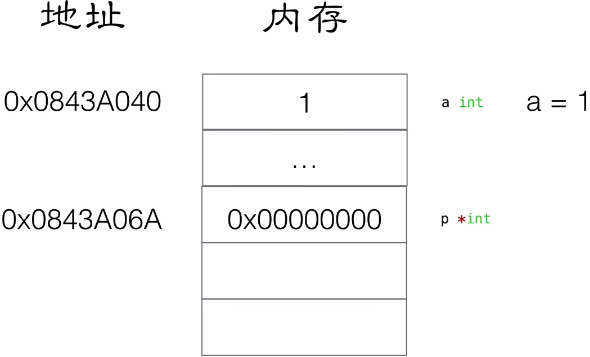
7、指针
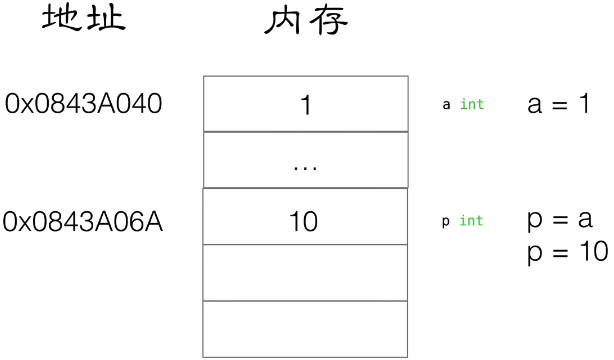
(1)值传递
package main import "fmt" func changeValue(p int) { p = 10 } func main() { var a int = 1 changeValue(a) fmt.Println("a = ", a) }
// 输出结果如下 a = 1
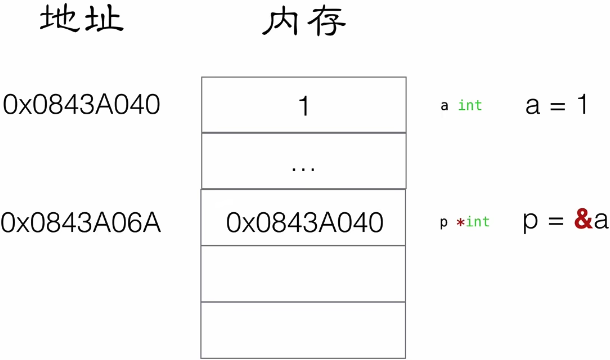
(2)引用传递
package main import "fmt" func changeValue(p *int) { *p = 10 } func main() { var a int = 1 changeValue(&a) fmt.Println("a = ", a) }
// 输出结果如下 a = 10
【例题:交换两个数值】
(1)采用值交换
package main import "fmt" func swap(a int, b int) { var temp int temp = a a = b b = temp } func main() { var a int = 10 var b int = 20 swap(a, b) fmt.Println("a = ", a, " ,b = ", b) }
// 输出结果如下 a = 10 ,b = 20
(2)采用地址交换
package main import "fmt" func swap(pa *int, pb *int) { var temp int temp = *pa // temp = main::a *pa = *pb // main::a = main::b *pb = temp // *pb = temp } func main() { var a int = 10 var b int = 20 swap(&a, &b) fmt.Println("a = ", a, " ,b = ", b) }
// 输出结果如下 a = 20 ,b = 10
8、defer
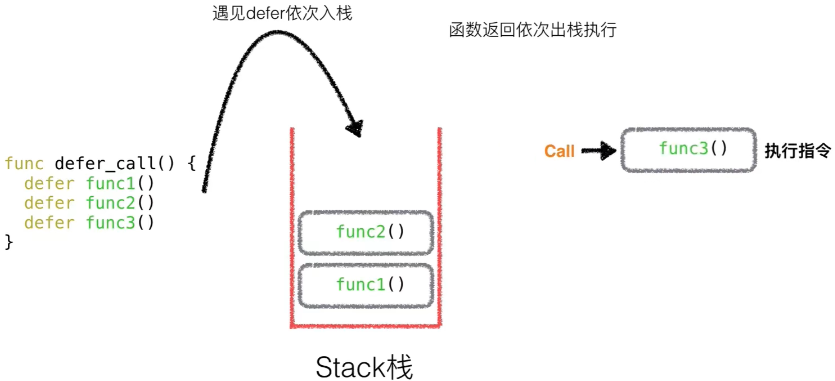
(1)defer的执行顺序
package main import "fmt" func func1() { fmt.Println("A") } func func2() { fmt.Println("B") } func func3() { fmt.Println("C") } func main() { // defer关键字 defer func1() defer func2() defer func3() }
// 输出结果如下 C B A
(2)defer和return谁先谁后
结论:return之后的语句先执行,defer之后的语句后执行
package main import "fmt" func deferFunc() int { fmt.Println("defer func called...") return 0 } func returnFunc() int { fmt.Println("return func called...") return 0 } func returnANDdefer() int { defer deferFunc() return returnFunc() } func main() { returnANDdefer() }
// 输出结果如下 return func called... defer func called...
9、切片slice
(1)数组
1)数组的长度是固定的
2)固定长度的数组在传参的时候,是严格匹配数组类型的
package main import "fmt" func printArray(myArray [4]int) { // 值拷贝 for index, value := range myArray { fmt.Println("index = ", index, "value = ", value) } myArray[0] = 111 } func main() { // 固定长度的数组 var myArray1 [10]int myArray2 := [10]int{1,2,3,4} myArray3 := [4]int{11,22,33,44} // for遍历方法一: // for i := 0; i < 10; i++ { for i := 0; i < len(myArray1); i++ { fmt.Println(myArray1[i]) } // for遍历方法二: for index, value := range myArray2 { fmt.Println("index = ", index, "value = ", value) } // 查看数组的数据类型 fmt.Printf("myArray1 types = %T\n", myArray1) fmt.Printf("myArray2 types = %T\n", myArray2) fmt.Printf("myArray3 types = %T\n", myArray3) printArray(myArray3) }
// 输出结果如下: 0 0 0 0 0 0 0 0 0 0 index = 0 value = 1 index = 1 value = 2 index = 2 value = 3 index = 3 value = 4 index = 4 value = 0 index = 5 value = 0 index = 6 value = 0 index = 7 value = 0 index = 8 value = 0 index = 9 value = 0 myArray1 types = [10]int myArray2 types = [10]int myArray3 types = [4]int index = 0 value = 11 index = 1 value = 22 index = 2 value = 33 index = 3 value = 44
(2)slice动态数组
动态数组在传参上是引用传递,而且对于不同元素长度的动态数组,它们的形参是一致的。
package main import "fmt" func printArray(myArray []int) { // 引用传递 // '_' 表示匿名变量 for _, value := range myArray { fmt.Println("value = ", value) } myArray[0] = 100 } func main() { myArray := []int{1,2,3,4} //动态数组, 切片 slice fmt.Printf("myArray type is %T\n", myArray) printArray(myArray) fmt.Println("==========") for _, value := range myArray { fmt.Println("value = ", value) } }
// 输出结果如下: myArray type is []int value = 1 value = 2 value = 3 value = 4 ========== value = 100 value = 2 value = 3 value = 4
10、slice切片的4种声明定义
(1)声明方式
package main import "fmt" func main() { // 声明slice1是一个切片,并且初始化,默认值是1,2,3。长度len是3 slice1 := []int{1,2,3,4} fmt.Printf("len = %d, slice = %v\n", len(slice1), slice1) // 声明slice2是一个切片,但是没有给slice分配空间 var slice2 []int slice2 = make([]int, 4) fmt.Printf("len = %d, slice = %v\n", len(slice2), slice2) // 声明slice3是一个切片,同时给slice分配空间,4个空间,初始化值为0 var slice3 []int = make([]int, 4) fmt.Printf("len = %d, slice = %v\n", len(slice3), slice3) // 声明slice3是一个切片,同时给slice分配空间。通过:=推导出slice是一个切片 slice4 := make([]int, 4) fmt.Printf("len = %d, slice = %v\n", len(slice4), slice4) }
// 输出结果如下: len = 4, slice = [1 2 3 4] len = 4, slice = [0 0 0 0] len = 4, slice = [0 0 0 0] len = 4, slice = [0 0 0 0]
1)判断一个slice是否为0,“slice == nil ”
package main import "fmt" func main() { var slice []int fmt.Printf("len = %d, slice = %v\n", len(slice), slice) if slice == nil { fmt.Println("slice 是一个空切片") } else { fmt.Println("slice 是由空间的") } }
// 输出结果如下: len = 0, slice = [] slice 是一个空切片
(2)使用方式
1)切片容量的追加
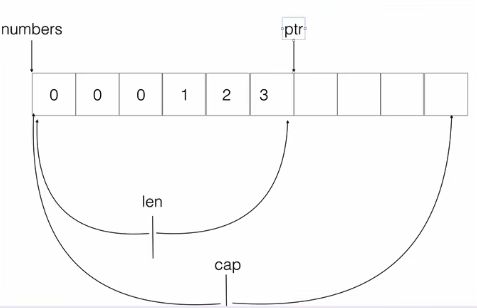
切片的len和cap不同,长度表示左指针至右指针之间的距离,容量表示左指针至底层数组末尾的距离
切片的扩容机制,append的时候,如果len增加后超过cap,则将容量增加2倍
package main import "fmt" func main() { var slice = make([]int, 3, 5) fmt.Printf("len = %d, cap = %d, slice = %v\n", len(slice), cap(slice), slice) // 向slice切片追加一个元素1,len = 4, [0, 0, 0, 1],但是cap = 5 slice = append(slice, 1) fmt.Printf("len = %d, cap = %d, slice = %v\n", len(slice), cap(slice), slice) // 向slice切片再追加一个元素2,len = 5, [0, 0, 0, 1, 2],但是cap = 5 slice = append(slice, 2) fmt.Printf("len = %d, cap = %d, slice = %v\n", len(slice), cap(slice), slice) slice = append(slice, 3) fmt.Printf("len = %d, cap = %d, slice = %v\n", len(slice), cap(slice), slice) slice = append(slice, 4) fmt.Printf("len = %d, cap = %d, slice = %v\n", len(slice), cap(slice), slice) }
// 输出结果如下: len = 3, cap = 5, slice = [0 0 0] len = 4, cap = 5, slice = [0 0 0 1] len = 5, cap = 5, slice = [0 0 0 1 2] len = 6, cap = 10, slice = [0 0 0 1 2 3] len = 7, cap = 10, slice = [0 0 0 1 2 3 4]
********* 当追加的元素后,len超过原cap,此时cap会自动扩大一倍, 即cap += cap **********
2)切片容量的截取
package main import "fmt" func main() { slice := []int{1,2,3,4} // 截取的范围 [0, 2) fmt.Println("slice[0:2] = ", slice[0:2]) // 默认下限为 0 fmt.Println("slice[:2] = ", slice[:2]) // 默认上限为 len(slice) fmt.Println("slice[1:] = ", slice[1:]) // 打印子切片 s := slice[0:3] fmt.Println("s = ", s) }
// 输出结果如下: slice[0:2] = [1 2] slice[:2] = [1 2] slice[1:] = [2 3 4] s = [1 2 3]
copy 拷贝副本
package main import "fmt" func main() { slice := []int{1,2,3,4} s1 := slice[0:2] fmt.Println(slice) fmt.Println(s1) s1[0] = 100 fmt.Println(slice) fmt.Println(s1) // copy 可以将底层数组的slice一起进行拷贝 s2 := make([]int, 3) // len = 3 copy(s2, slice) fmt.Println(s2) }
// 输出结果如下: [1 2 3 4] [1 2] [100 2 3 4] [100 2] [100 2 3]
11、map
(1)3种声明定义方式
package main import "fmt" func main() { // =======> 第一种声明方式 // 声明myMap1是一种map类型,key是string,value是string var myMap1 map[string]string if myMap1 == nil { fmt.Println("myMap1 是一个空map") } // 使用map前,需要先用make给map分配数据空间 myMap1 = make(map[string]string, 10) myMap1["one"] = "Java" myMap1["two"] = "C++" myMap1["three"] = "Python" fmt.Println("------------\n", myMap1) // =======> 第二种声明方式 myMap2 := make(map[int]string) myMap2[1] = "Java" myMap2[2] = "C++" myMap2[3] = "Python" fmt.Println("------------\n", myMap2) // =======> 第三种声明方式 myMap3 := map[string] string { "one" : "Java", "two" : "C++", "three" : "Python", } fmt.Println("------------\n", myMap3) }
// 输出结果如下: myMap1 是一个空map ------------ map[one:Java three:Python two:C++] ------------ map[1:Java 2:C++ 3:Python] ------------ map[one:Java three:Python two:C++]
(2)使用方式
package main import "fmt" func printMap(cityMap map[string]string) { // cityMap是一个引用类传递 for key, value := range cityMap { fmt.Println("key = ", key) fmt.Println("value = ", value) } } func main() { cityMap := make(map[string]string) // 添加 cityMap["China"] = "Beijing" cityMap["Japan"] = "Tokyo" cityMap["USA"] = "NewYork" // 遍历 printMap(cityMap) // 删除 delete(cityMap, "China") // 修改 cityMap["USA"] = "DC" fmt.Println("----------------") // 遍历 printMap(cityMap) }
// 输出结果如下: key = China value = Beijing key = Japan value = Tokyo key = USA value = NewYork ---------------- key = Japan value = Tokyo key = USA value = DC
12、结构体(Struct)的定义与使用
package main import "fmt" // 声明一种新的数据类型myint,是int的一个别名 type myint int // 定义一个结构体 type Book struct { title string auth string } func changeBook_1(book Book) { // 传递一个book副本 book.auth = "666" } func changeBook_2(book *Book) { // 指针传递 book.auth = "888" } func main() { var book1 Book book1.title = "Golang" book1.auth = "ZhangSan" fmt.Printf("%v\n", book1) changeBook_1(book1) fmt.Printf("%v\n", book1) changeBook_2(&book1) fmt.Printf("%v\n", book1) }
// 输出结果如下: {Golang ZhangSan} {Golang ZhangSan} {Golang 888}
13、面向对象特征
(1)封装
1)值传递
package main import "fmt" type Hero struct { Name string Ad int Level int } func (hero Hero) Show() { fmt.Println("Name = ", hero.Name) fmt.Println("Ad = ", hero.Ad) fmt.Println("Level = ", hero.Level) } func (hero Hero) GetName() string { return hero.Name } func (hero Hero) SetName(newName string) { // hero 是调用该方法的对象的一个副本 hero.Name = newName } func main() { // 创建一个对象 hero := Hero{Name : "ZhangSan", Ad : 100, Level:1} hero.Show() hero.SetName("XiaoAn") hero.Show() }
// 输出结果如下: Name = ZhangSan Ad = 100 Level = 1 Name = ZhangSan Ad = 100 Level = 1
2)引用传递
package main import "fmt" type Hero struct { Name string Ad int Level int } func (hero *Hero) Show() { fmt.Println("Name = ", hero.Name) fmt.Println("Ad = ", hero.Ad) fmt.Println("Level = ", hero.Level) } func (hero *Hero) GetName() string { return hero.Name } func (hero *Hero) SetName(newName string) { // hero 是调用该方法的对象的一个副本 hero.Name = newName } func main() { // 创建一个对象 hero := Hero{Name : "ZhangSan", Ad : 100, Level:1} hero.Show() hero.SetName("XiaoAn") hero.Show() }
// 输出结果如下: Name = ZhangSan Ad = 100 Level = 1 Name = XiaoAn Ad = 100 Level = 1
如果类名、属性名、方法名首字母大写,表示对外(其他包)可以访问,否则只能在本包内访问。
(2)继承
package main import "fmt" type Human struct { name string sex string } func (this *Human) Eat() { fmt.Println("Human.Eat()...") } func (this *Human) Walk() { fmt.Println("Human.Walk()...") } /* ------------------------------------- */ type SuperMan struct { Human // SuperMan类继承了Human类的方法 level int } // 重新定义父类的方法Eat() func (this *SuperMan) Eat() { fmt.Println("SuperMan.Eat()...") } // 子类的新方法 func (this *SuperMan) Fly() { fmt.Println("SuperMan.Fly()...") } func main() { h := Human{"ZhangSan", "Boy"} h.Eat() h.Walk() // 定义一个子类对象 // s := SuperMan{ Human{"XiaoAn", "Girl"}, 1} var s SuperMan s.name = "XiaoAn" s.sex = "Girl" s.level = 1 s.Eat() s.Walk() s.Fly() }
// 输出结果如下: Human.Eat()... Human.Walk()... SuperMan.Eat()... Human.Walk()... SuperMan.Fly()...
(3)多态
1)基本要素
有一个父类(接口)
有子类(实现了父类的全部接口方法)
父类类型的变量(指针)指向(引用)子类的具体数据变量
package main import "fmt" // 本质是一个指针 type AnimalIF interface { Sleep() GetColor() string GetType() string } // 具体的类 type Cat struct { color string } func (this *Cat) Sleep() { fmt.Println("Cat is Sleep") } func (this *Cat) GetColor() string { return this.color } func (this *Cat) GetType() string { return "Cat" } // 具体的类 type Dog struct { color string } func (this *Dog) Sleep() { fmt.Println("Dog is Sleep") } func (this *Dog) GetColor() string { return this.color } func (this *Dog) GetType() string { return "Dog" } func showAnimal(animal AnimalIF) { animal.Sleep() // 多态 fmt.Println("color = ", animal.GetColor()) fmt.Println("type = ", animal.GetType()) } func main() { /* var animal AnimalIF // 接口的数据类型,父类指针 animal = &Cat{"Green"} animal.Sleep() // 调用的是Cat的Sleep()方法,多态的现象 animal = &Dog{"Yellow"} animal.Sleep() // 调用的是Cat的Sleep()方法,多态的现象 */ cat := Cat{"Green"} dog := Dog{"Yellow"} showAnimal(&cat) showAnimal(&dog) }
// 输出结果如下: Cat is Sleep color = Green type = Cat Dog is Sleep color = Yellow type = Dog
14、interface空接口
(1)万能类型
(2)类型断言机制
package main import "fmt" // interface{}是万能数据类型 func myFunc(arg interface{}) { fmt.Println("myFunc is called...") fmt.Println(arg) // interface() 该如何区分 此时引用的底层数据类型到底是什么? // 给 interface() 提供“类型断言”的机制 value, ok := arg.(string) if !ok { fmt.Println("arg is not string type") } else { fmt.Println("arg is string type, value = ", value) fmt.Printf("value type is %T\n", value) } } type Book struct { auth string } func main() { book := Book{"Golang"} myFunc(book) myFunc(100) myFunc("abc") myFunc(3.14) }
// 输出结果如下: myFunc is called... {Golang} arg is not string type myFunc is called... 100 arg is not string type myFunc is called... abc arg is string type, value = abc value type is string myFunc is called... 3.14 arg is not string type
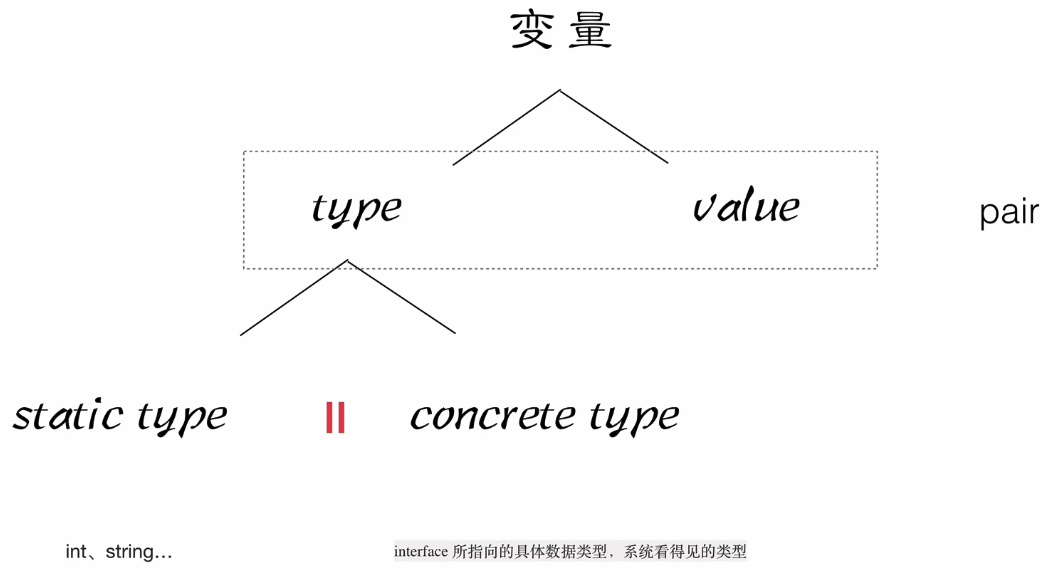
15、变量的内置pair结构详细说明
1)static type 静态类型 ——> int、char、string......
2)concrete type 具体类型 ——> interface所指向的具体数据类型,系统看得见的类型
package main import "fmt" func main() { var a string // pair<statictype:string, value:"abcd"> a = "abcd" // pair<type:strig, value:"abcd"> var allType interface{} allType = a str, _ := allType.(string) fmt.Println(str) }
// 输出结果如下: abcd
package main import ( "fmt" "os" ) func main() { // tty: pair<type:*os.File, value:"/dev/tty" 文件描述符> tty, err := os.OpenFile("/dev/tty", os.O_RDER, 0) if err != nil { fmt.Println("open file error", err) return } // r: pair<type: ,value:> var r io.Reader // r: pair<type:*os.File ,value:"/dev/tty"文件描述符> r = tty // w: pair<type: ,value:> var w io.Writer // w: pair<type:*os.File ,value:"/dev/tty"文件描述符> w = r.(io.Writer) w.Writer([]byte("Hello this is a Test!\n")) }
// 输出结果如下: Hello this is a Test!
3)读写操作
package main import "fmt" type Reader interface { ReadBook() } type Writer interface { WriteBook() } // 具体的类 type Book struct {} func (this *Book) ReadBook() { fmt.Println("Read a Book") } func (this *Book) WriteBook() { fmt.Println("Write a Book") } func main() { // b: pair<type:Book, value:book{}地址> b := &Book{} // r: pair<type:, value:> var r Reader // r: pair<type:Book, value:book{}地址> r = b r.ReadBook() // w: pair<type:, value:> var w Writer // w: pair<type:Book, value:book{}地址> w = r.(Writer) // 此处的断言为什么会成功? 因为w和r具体的type是一致的 w.WriteBook() }
// 输出结果如下: Read a Book Write a Book
********* 断言有两步:得到动态类型type,判断type是否实现了目标接口。**这里断言成功是因为Book实现了Writer接口。 **********
16、反射reflect机制
(1)reflect包
1)反射出参数的值
// ValueOf returns a new Value initialized to the concrete value // stored in the interface i. ValueOf(nil) returns the zero func ValueOf(i interface{}) Value {...} // ValueOf 用来获取输入参数接口中的数据的值,如果接口为空则返回0
2)反射出参数的类型
// TypeOf returns the reflection Type that represents the dynamic type of i. // If i is a nil interface value, TypeOf returns nil. func TypeOf(i interface{}) Type {...} // TypeOf 用来动态获取输入参数接口中的值的类型,如果接口为空则返回nil
(2)
1)例一:
package main import ( "fmt" "reflect" ) func reflectNum(arg interface{}) { fmt.Println("type : ", reflect.TypeOf(arg)) fmt.Println("value : ", reflect.ValueOf(arg)) } func main() { var num float64 = 1.2345 reflectNum(num) }
// 输出结果如下: type : float64 value : 1.2345
2)例二:
package main import ( "fmt" "reflect" ) // 具体的类 type User struct { Id int Name string Age int } // 方法Call() func (this User) Call() { fmt.Println("User is called ...") fmt.Printf("%v\n", this) } func main() { // 创建一个对象user user := User{1, "Abcd", 18} DoFiled_Method(user) } func DoFiled_Method(input interface{}) { // 获取input的type :user是User类型 inputType := reflect.TypeOf(input) fmt.Println("inputType is : ", inputType.Name()) // 获取imput的value :user的属性 inputValue := reflect.ValueOf(input) fmt.Println("inputValue is : ", inputValue) // 遍历:通过type获取里面的字段(分为三步) // 1、获取interface的reflectType,通过Type得到NumField,进行遍历 // 2、得到每个field,数据类型 // 3、通过field有一个Interface()方法等到对应的value for i := 0; i < inputType.NumField(); i++ { field := inputType.Field(i) value := inputValue.Field(i).Interface() fmt.Printf("%s : %v = %v\n" ,field.Name, field.Type, value) } // 通过type获取里面的方法、调用 for i := 0; i < inputType.NumMethod(); i++ { m := inputType.Method(i) fmt.Printf("%s : %v\n", m.Name, m.Type) } }
// 输出结果如下: inputType is : User inputValue is : {1 Abcd 18} Id : int = 1 Name : string = Abcd Age : int = 18 Call : func(main.User)
17、反射解析结构体标签Tag(定义)
**************** 注意下面代码中用的是 反引号`` ******************
package main import ( "fmt" "reflect" ) type resume struct { // 引号内容 是变量的标签 // 作用是 其他包在调用该变量时判断此变量在本包中如何使用 Name string `info:"name" doc:"我的名字"` // 此处用的是反引号 `` Sex string `info:"sex"` } func findTag(str interface{}) { t := reflect.TypeOf(str).Elem() for i := 0; i < t.NumField(); i++ { taginfo := t.Field(i).Tag.Get("info") tagdoc := t.Field(i).Tag.Get("doc") fmt.Println("info: ", taginfo, "doc: ", tagdoc) } } func main() { var re resume findTag(&re) }
// 输出结果如下: info: name doc: 我的名字 info: sex doc:
18、结构体标签在json中的应用
package main import ( "fmt" "encoding/json" ) type Movie struct { Title string `json:"title"` Year int `json:"year"` Price int `json:"rmb"` Actors []string `json:"actors"` } func main() { movie := Movie{"喜剧之王", 2000, 10, []string{"xingye", "zhangbozhi"}} // 编码过程: 将结构体 ——> json jsonStr, err := json.Marshal(movie) if err != nil { fmt.Println("json marshal error", err) return } fmt.Printf("jsonStr = %s\n", jsonStr) // 解码过程 将json ——> 结构体 myMovie := Movie{} err = json.Unmarshal(jsonStr, &myMovie) if err != nil { fmt.Println("json Unmarshal error", err) return } fmt.Printf("myMovie = %v\n", myMovie) }
// 输出结果如下: jsonStr = {"title":"喜剧之王","year":2000,"rmb":10,"actors":["xingye","zhangbozhi"]} myMovie = {喜剧之王 2000 10 [xingye zhangbozhi]}
待续......
